How to Dry Fruits and Vegetables Using a Food Dehydrator
If you want to stay healthy without cutting down on your snacking, then it’s time to embrace food dehydration. The process of drying out fruits, vegetables, and meats has been around for generations, but only recently has it become popular amongst health conscious families. The only trouble is that because food dehydrators have been so specialized for so long, it can feel intimidating to dive into this exciting culinary culture. Well, we’re here to tell you that there’s nothing to fear. Dehydrating fruits and vegetables is so simple and satisfying that every family should be doing it! All it takes is a few simple steps.
The first important step to take is realizing how simple and approachable these machines are. Food dehydrators are economical, user-friendly appliances that enable consumers to process foods for snacking or long-term storage. How do they work? Well, dehydrators combine low heat with circulating fans to eliminate moisture from fruits and vegetables. The process is almost identical whether you want to make chips, rolls, or leather. Preparing food in this way also ensures that the nutritional integrity of produce is preserved. It’s a fantastic way of getting the most bang for your buck when you make some major purchase in the produce aisle. So, here we are, sharing basic knowledge and a few helpful hints to help you get started.
Food Preparation
Before attempting your first dehydration process, make sure to gently wash the produce. Then core, hull, or peel your produce as needed. Before drying fruits and vegetables with low acidity levels, steam the food for approximately 10 minutes. Blanching these foods for a few minutes is another option. Blanching or steaming locks in flavour, softens the skin, and preserves the color of your food. Next, allow the fruits and veggies to cool and pat them dry. It’s also worth noting that apples, bananas, pears, and other low acidic fruits should be lightly coated with lemon or pineapple juice to prevent browning during the dehydration process.
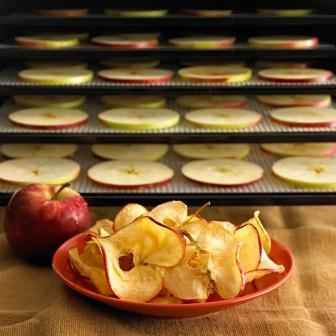
If you want to make fruit or vegetable chips, slice the produce uniformly into 1/8 inch slices. Produce can also be diced into ½ inch pieces or julienne cut with a potato peeler. Finally, put the prepared fruits and veggies in a single layer on clean trays. Ensure that the pieces or slices do not overlap so the warm air flows equally through all of the trays. If there is any overlap, those pieces may not dry evenly. It won’t ruin your whole batch of snacks, but it will ruin a few pieces that you’ll have to painstakingly remove from the batch.
Time and Temperature
Dehydrating temperatures vary for different types of produce depending on the type of appliance used. Most units come with operator’s instructions and recipe guides to help you through this step of the process. However, some general rule of thumb settings include:
Vegetables
• Broccoli or cauliflower: 8 hours at 125° F
• Canned beets: 8 to 10 hours at 135° F
• Carrots: 6 to 10 hours at 125° F
• Cucumbers: 8 hours at 135° F for crispy chips or 6 hours at 125° F for chewy
• Frozen vegetables: 6 to 8 hours at 125° F
• Green beans: 8 hours at 125° F
• Mushrooms: 6 to 8 hours at 125° F
• Onions: 2 hours at 145° F, then 6 to 8 hours at 135° F
• Peppers: 6 to 8 hours at 125° F
• Potatoes: 6 to 8 hours at 125° F
• Tomatoes: 8 to 10 hours at 135° F
• Zucchini: 8 hours at 135° F
Fruits
• Apples: 8 to 12 hours at 135° F
• Bananas: 8 to 12 hours at 135° F
• Blueberries: 12 to 20 hours at 135° F
• Grapes and oranges: 15 or more hours at 135° F
• Mangoes: 2 hours at 145° F then 6 to 10 hours at 135° F
• Peaches: 2 hours at 145° F then 6 to 10 hours at 135° F
• Pears: 8 to 12 hours at 135° F
• Pineapple: 2 hours at 145° F then 10 to 16 hours at 135° F (canned pineapple requires double the time)
• Strawberries: 8 to 12 hours at 135° F
Keep in mind that air conditioning, indoor humidity, or even breeze from an open window can interfere with the dehydration process and add drying time. So make sure to monitor your fruit and vegetables throughout the dehydration process for the best results.
Adequate Dehydration
Similar to using an oven for baking, make sure to turn on the dehydrator to the proper temperature to enable the device to heat before adding your produce-filled trays. You fruit and vegetables should not be put in your dehydrator until it is properly heated. It’s also important to resist the urge to increase temperature settings in order to dry produce faster. Sure, the outside of slices or pieces will quickly dry. However, the moisture will then be sealed in the centers rather than evenly drying. This will encourage spoiling and potentially ruin your entire batch of dehydrated fruits and vegetables.
In order to store processed foods for longer periods of time without fear of bacterial invasion or mold development, the produce should have at least 95% of the moisture removed during the dehydration process. Foods that have dried out to this degree are typically hard enough to break easily or are crunchy. Unless making fruit or vegetable leather, foods which are soft, spongy, or sticky require longer drying time. Sometimes if your batch of fruit or vegetables is drying unevenly or inconsistently, it’s a good idea to handle some of the food and test it’s texture to ensure that it’s dehydrated properly.
Storing Dehydrated Foods
Once the dehydration process is complete, allow the food to cool down to room temperature. Processed foods should be stored in cool, dark, and dry places. Do not freeze your dehydrated treats. Ice crystals will form and spoil all of your hard work. Vacuum sealing dehydrated foods is the ideal storage method. However, you can also use regular zipped plastic bags. Fill the bags to the desired level and then force the air sufficiently out of each bag before completely closing. If you don’t intend to eat your dehydrated foods quickly, make sure to check your inventory once every one or two weeks to ensure quality. Dehydrated fruits and vegetables do last a great deal longer than fresh fruits and vegetables, but they will still expire eventually.
Rehydrating fruits or vegetables merely requires adding one cup of water to one cup of dehydrated food. Set aside for up to four hours. If using the food in soups or stews, add the desired amount of vegetables and water necessary to create your recipe. It’s amazing how easily dried vegetables can be revived.
Along with maintaining mineral and vitamin content, dehydrating your own foods also provides you with more control over the ingredients of recipes. Prior to drying, consider applying herbs and spices to fruits and vegetables for added zest. The possibilities are almost endless!
Honestly, that’s really all you need to know to get started on your food dehydrating adventure. The process may seem mysterious and complex from the outside, but the truth of the matter is that it is actually quite a simple and satisfying way of making healthy snacks for your whole family. Follow these simple steps and you’ll be able to dehydrate your own fruits and vegetables tomorrow! Once you test your first batch of freshly dehydrated food, you’ll never go back. Trust us.